Range Trading Profit Targets: Midpoint, Boundary and Expansion
Use the range midpoint and opposite boundary after a sweep, and measured range heights after a breakout. Includes a historical Nasdaq chart example.
4 min read · Free guide · No signup required
Jump to a section
- Mark the range before measuring a target
- After a sweep, map the midpoint and opposite boundary
- After a held breakout, project one and two range heights
- Nasdaq example: the target arrived early in the week
- Respect invalidation while the target remains untouched
- Draw both maps before choosing one
- Watch the example
Price is approaching the level you marked before the trade. Another strong candle makes holding for more tempting. If you never decided what that level meant, you are now choosing an exit while the position is moving.
The Stoic Range Model gives you two target maps: midpoint and opposite boundary after a sweep and held retest inside the range, or one and two range heights after a break and held retest outside it. This guide shows how to choose the right map and compare the room to your risk before entry.
Those levels give you places to make decisions. Price can turn before reaching them, and reaching a level does not tell you what happens next.
Mark the range before measuring a target
Identify the range high and low from the consolidation you are studying. The midpoint sits halfway between them. Keep that parent range visible when you move to a smaller chart for an entry.
For illustration, a range from 100 to 110 has a midpoint of 105 and a height of 10. This arithmetic example is separate from the historical chart below.
Changing the box after every price move can make almost any target appear correct in hindsight. Keep a record of the range you used when making the decision.
After a sweep, map the midpoint and opposite boundary
When price sweeps below the low, returns inside, and holds a retest, the midpoint is the first reference objective. The range high is the next one if the move continues. One sweep above the high gives the reverse map: midpoint first, then range low.
In the illustrative 100–110 range, a bullish reclaim near 100 would put 105 and 110 on the map. Whether either objective offers enough room depends on your actual entry and stop.
You do not have to hold every position for the opposite boundary. Decide how you will handle the midpoint before entering, then watch whether the trade continues to behave as expected.
After a held breakout, project one and two range heights
For a sustained break above the range high, project the range height upward from that boundary. In the same arithmetic example, a height of 10 gives objectives of 120 and 130 above the 110 high. Below the 100 low, the corresponding projections are 90 and 80.
These projections describe distance. They do not assign a probability of reaching it. If price fails to hold outside the boundary, the expansion premise may no longer apply.
The break-and-retest guide explains how a smaller entry pattern fits into that larger map.
Nasdaq example: the target arrived early in the week
The September 27 episode reviews Nasdaq moving from the midpoint toward the range high on September 21.
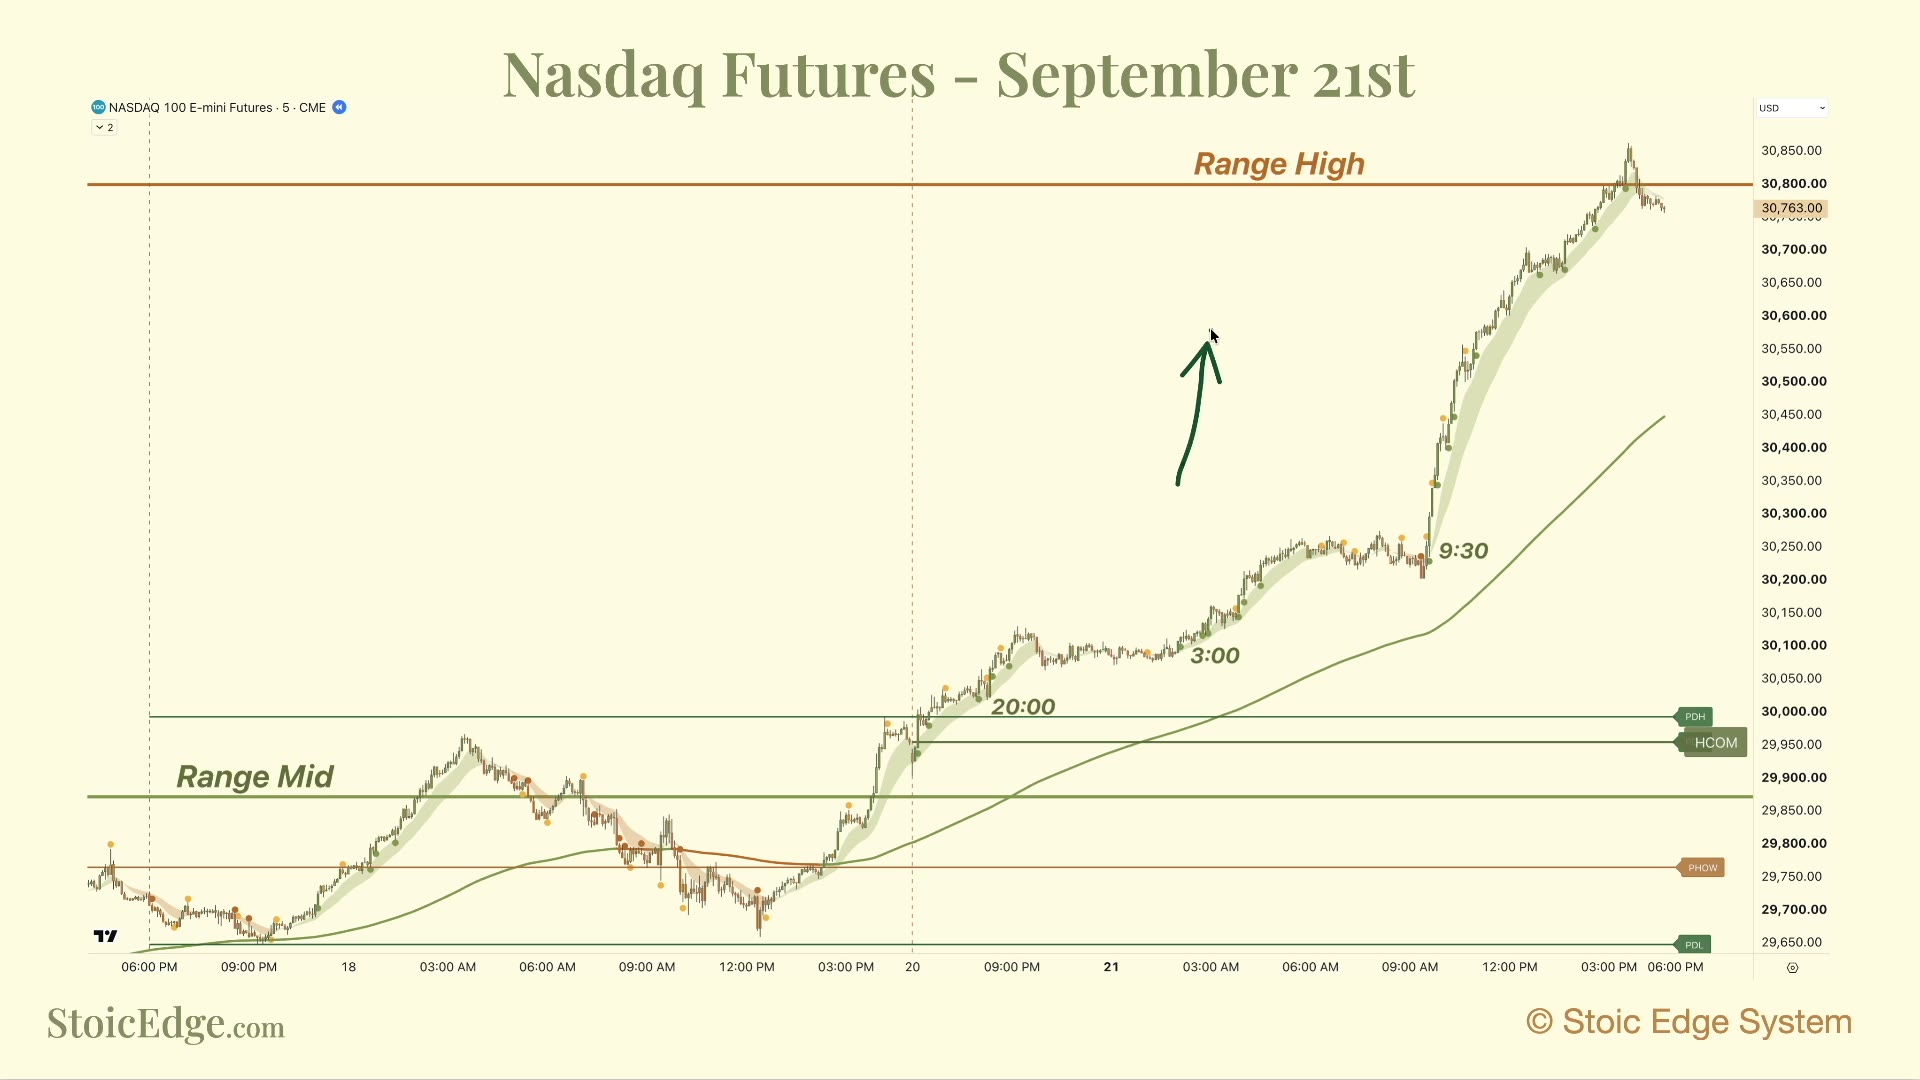
Around 2:11, the recording turns to the smaller chart. It follows the advance through the session and the local entry opportunities along the way. Around 5:32, the discussion returns to the range-high objective.
The useful decision is what to do once price has covered the distance you planned to trade. The episode notes the possibility of a reaction at the high. Another candle in the same direction would not, by itself, create a fresh trade.
This is a retrospective teaching example, not a record of an executed position or its return.
Respect invalidation while the target remains untouched
Review the trade against its original conditions. If the reason for holding has failed, an untouched target does not restore it. If the setup remains valid, manage it according to the plan you chose.
Before entry, record your first objective, what would invalidate the trade, and how you will respond if momentum stalls. This makes a later exit easier to assess without pretending you can know the exact turning point.
The guide to stopping overtrading covers the next decision: whether there is any reason to keep trading after the planned move.
Draw both maps before choosing one
Use the illustrative 100–110 range on paper. Mark 105 as the midpoint, 120 and 130 above the range, and 90 and 80 below it. Now describe two different responses: a sweep below 100 that reclaims and holds inside, and a break above 110 that retests and holds outside.
Circle the objectives that belong to each response. Then add a hypothetical entry and invalidation to each sketch and compare the available distance. The exercise is complete when you can explain why the same range produces different objectives; none of the numbers is a forecast.
The Compass product guide shows how its chart reading can sit beside this plan. Your chosen target and management rule remain explicit.
Watch the example
Watch the complete episode, or go to the Nasdaq review at 2:11 on YouTube.
Use the full Range Model guide to connect these objectives to the two boundary responses. Test the rules you intend to use; one historical chart cannot show how a method performs across different conditions.
Stoic Edge provides education. Historical examples and practice exercises do not establish future performance.
Watch the source videos
Study the original demonstrations alongside this guide. Recording dates and historical context appear on each video page.
Keep learning for free
